Showing posts with label Fun How-To Projects. Show all posts

Friday, July 17, 2015

How to Create a Product from Nuthin to Sumthin

Once in a while, you create an image your reeeaaallly like. 
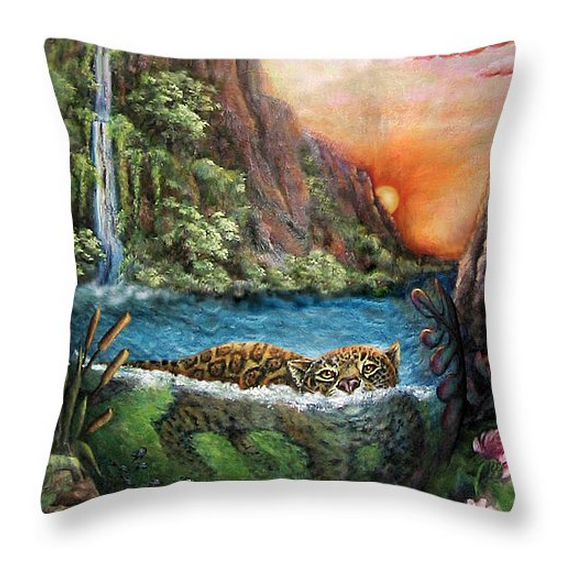
"Jaguar Sunset"


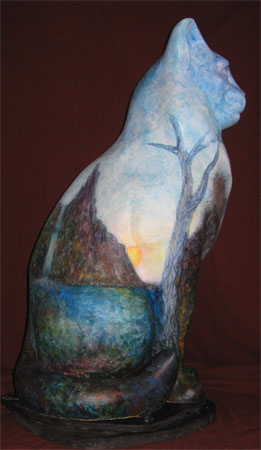
A few years ago I painted a 3 foot tall cat statue for a charity auction. It was titled Little Cat's Four Season Fantasy. Each side featured the different seasons of the year.

It was the second one I painted, the previous statue having sold at auction for $1100. So of COURSE they nicely asked me to paint another! I was happy to help, since it was for C.A.T.S., Committed Alliance to Strays.

But since I donated it to charity - and seeing as how I loved some of the images on it - I decided to photograph them for my own collection. This fantasy setting of the jaguar swimming in a cool pool at sunset was one of my favorites. 

To put it into context, here is the completed
 3 ft tall statue from different angles:
(can click on any images to enlarge)


But how do I translate that into a product to offer collectors??

Here's what I did.

It all started with a nekkid statue:


Underpainting  getting started:


Giving him some spots:


Continuing around the jaguar:


All done:


So how does he look when you put his image onto products? I found a site that does "POD"  (print on demand) and I'm very happy with their quality. Here are some of the things they can do with my jaguar. I was so tickled when I saw these for the first time!


And here is how he looks on a throw pillow.


The newest to join the product line is this cute Tote bag


I think the metal prints are cool!


They even have smart phone case covers.


Naturally there are also greeting cards, framed prints, canvas prints,  and posters.

And there you have it. From blank white statue to all kinds of fun stuff to put your image on. 

I hope you found this interesting. I sure had fun seeing my little jaguar on all these items. If you have any questions about Fine Art America (FAA), the folks who do my printing, just give a holler in the comments and I'd be glad to share my experiences. 

Now, imagine something YOU created.  If you have paintings, images of your creative endeavors, or photographs that you'd like to have printed, I can wholeheartedly recommend FAA. You have your original, yes. But by creating "multiples" of your efforts, you can offer your art to more people in many more forms, including gift giving.

If you try FineArtAmerica, I'd love to hear how it went for you. :-)

Thanks for reading,


Retta

Friday, May 17, 2013

How To "RePurpose" Your Art!

These days we are all learning to reuse, recycle, repurpose stuff. Well, hows about our art?? I don't mean just the usual, like cards, prints, posters, etc; all the fun stuff that online print-on-demand places can create with your image.

I'm talking about ways that I can simply enjoy the image again, in a different format. And since I LOVE quotes, I enjoy making my own little motivational posters.

I think of good quotes as distilled wisdom. Um... notice I said good quotes. ;-)

It's easy to do. If you don't have Photoshop, which is where I play with mine, you can go to free places that do it automatically for you, in a set format, such as This Place.

Here is my latest... please to enjoy.


Happy poster making,

Retta


Friday, January 04, 2013

Fun How-To Project #2: Doodle Universe!


Previously, I shared a fun "how to loosen up" project using Sharpies to doodle on an apron (HERE).

Well, this time we take The Sharpie to new heights!! We. draw. right. on. the. wall!!!

Yep, onto the walls. In Sharpie. Really. :-O

I have a dinky bathroom that has been plain white for almost 4 years. MyGuy has been too busy to apply the promised paint, so one day I was hit with a "great" idea: doodle on the walls with a Sharpie! 

Thus was born the Doodle Universe. 

Eventually, I will add color. But for several reasons it's taken me 6 months to get this far, so I'm learning patience and perseverance. :-) 


Drawing directly onto the walls has several advantages:
  • You let go of perfectionist tendencies
  • It's fun and daring at the same time
  • It's a way to let your imagination loose, and just allow the design to surprise you as you go
  • It actually increases your confidence as you just "do it"

My method was to relax and just gaze at it, and "see" it first in my imagination. If I liked it, on to the wall it went.

My only rule: no pencil and eraser.

That was just my choice, since I wanted loosen up. There are no mistakes with this method, only accidental adventures! If I slip (which I occasionally did), then the design takes a turn in a different direction. It's all good!

Here is the Doodle Universe thus far. First, here is the view as you walk into the tiny half/bath; this is the right wall, and then it goes on around to the left (can click on any pics to enlarge):


Before I started:


Took a big breath, and started on Wall 1:


Wall 1 day later:


Here are Walls 1 and 2 finished:


On to Wall 3, to the left of the sink:


This shows the design progressing around to Wall 4:


Wall 4:


Now Wall 5, over the Throne:


Close up of Wall 5:


Continuing over to the last Wall 6:


And a shot of just the last Wall 6, all done:


My next plan is to add subtle shading, and eventually color. The acrylic color will be in two parts: a pale sponged on background with hints of color; and some brighter color notes right on the main design elements.

And the symbolism?

-Within my Doodle Universe are separate Doodle Galaxies.

-Each main Galaxy has similiar components attached to it, such as the giant wings,  showing movement and change, albeit slow). 

-There are similarities, yet no two Galaxies are identical, they are unique, like people.

-There are cloud-like connectors between the Galaxies; they are separate, yet connected; autonomous, yet needing each other.

-Each Galaxy has tails hanging down, kind of like tails on a kite; they symbolize anchors, a source of stability.

-They also each have a Vine design, representing growth, change, new life.

-There are stylized stars and moons, symbols of reaching for hopes and dreams.


I may eventually add angels, little space ships, quotes... who knows how it will turn out in the end! 


I hope you've enjoyed this glimpse into my Doodle Universe!


Happy doodling,

Retta

Saturday, September 29, 2012

Art as Therapy... A Fun How-To Project


At times, we all have emotions we need to process. Some of us are very visual, and find it helpful to just relax and doodle. There's not a lot of planning to it. It's stress free, and it can allow our mind to relax and just feel. We're not out to impress anybody with our oh-so-serious art. It's just casual fun.

That's the approach I took after my Dad died in March of 2011. I wanted to contribute a personalized photo to a collection being put together in his memory. 

I picked out a favorite of photo of me and Dad from when I was about 3 years old... and doodled on it! Mine was done digitally. I found an old black and white photograph, scanned it in, cropped it, changed it to sepia tone, and then did my doodling in Photoshop Elements.

But you could use Sharpies or whatever you like on a printed photo (can click photo to enlarge).


Loretta and Dad, 1954


As I doodled, I let the good memories bubble to the surface... and yes, shed a few tears. There was symbolism for me in the design, with the hearts, thorns, stars, spirals, etc. It was all so therapeutic, and I felt like Dad would have liked the finished personalized photo.

Naturally, it doesn't have to be for such a serious event! It can be for anything... a wedding photo, a birthday, anniversary, a loved one, a favorite memory, or just because! 

There is something about doing this to a photo that makes it feel special. It made me feel connected to my Dad, and to good memories.

If you try this, I would love to hear about it. :-)

Happy doodling,

Retta

Tuesday, September 18, 2012

How to Loosen Up... Fun How-To Project #1


Do you find yourself getting a little "tight" in your drawing or painting at times?? (I do)

Would you enjoy a short project aimed at having fun and loosening up? (I did)

I thought it would be fun to share a great way I found to loosen up in my drawing and painting. There are tons of free resources on the interwebs of course, and much more "scholarly" than mine. Mine is simply meant to be casual and fun, yet useful!

I enjoy colored pencils, pens, drawing, doodling, painting, etc etc. But over time I can tend to tighten up, trying to control the outcome too much. Then I get that tense feeling that says "Uh oh, what if I make a mistake?"

Here's a project to shake off the Tighties
 and get more of the Loosies:


The "Doodle" apron!

(can click any pics to enlarge)


Wanna try it? Here we go:

1. Get you a light colored apron, or pillowcase or hat or cotton shirt or white tennies, or whatever you like, to use as your "canvas".

Here was mine:


2. Get you a black permanent marker. Since this is for fun and "Loosen Up Therapy", I just used a good ol' Sharpie. I used the Gesso to cover up the advertising that was on the apron, so I could paint the motto on instead.


3. Now doodle!! No, don't plan it with pencil on paper first. And no fair drawing it with pencil first onto the item then tracing that with the Sharpie. The idea is to loosen up, and just draw. Use whatever style of drawing you enjoy. Or, be adventurous and try a new direction!

Remember, there are no mistakes here, only accidental adventures!!


4. Now have fun and color it! You can use plain old acrylics, or fabric paints, or permanent paint markers. Whatever floats your boat. I used DecoArt SoSoft Fabric Paint, since I wanted to set the paint in order to be able to wash my apron. I bought a set of little bottles from Dharma Trading Co. online, but they also have little "sampler" type sets for small projects, HERE.  I like this paint because it's washable without the hassle of heat setting it first. 

Tip: If you'd like to try this project without buying new paints, but already have regular acrylics, do like I've done in the past: just get one bottle of Fabric Medium, like this, and add it to your acrylics. It keeps them from getting stiff on your fabric, and works great.

Another tip: I used older brushes, so I could scrub it in to the fabric when needed, and not worry about ruining my nice brushes.


 Color scheme tip: If you aren't sure what colors to choose, a simple plan is to choose 3 (or more) favorites, then include a lighter and darker version of each. Above, you see I chose pink, blue, orange and green. Then included lighter and darker versions of each. Instead of adding white to lighten, or black or a dark color to darken, you can get fabulous clean and bright colors by choosing from around the color wheel. Example: for the Orange, I chose a red for the darker version, and a yellowish orange for the lighter side. Ditto for the rest of my colors. 


5. Here's pics of the painting in progress:


 I usually applied one color first with the little brush, 
then blended it out with the old small flat brush. 
I always started with the middle color, applying it 
everywhere on the apron where I wanted that color. 
Then added the darker version, again everywhere, 
blending it for soft edges; then lastly the highlight 
color, again blending the edges. Doing it in stages 
that way was faster than going back and forth 
constantly into the different colors:


I was having so much fun, I forgot
to take pics of the orange and 
green layers. :-D


6. And Ta Daaa! My finished Loosey Goosey Doodle Apron! :-)


Detail of finished apron:


There were lots of places that were "accidental adventures" on this design. But see? You'd never know it by the time the paint was on. 

I hope you enjoy this little relaxing "therapy" project. If you like it, I'd appreciate you mentioning it on Facebook to share the idea with others. Just click on the Facebook button at the bottom of the post. Thanks bunches!

Happy loose painting,

Retta


PS: Even kids would love this; it's the sort of project you can do together. Here is a LINK to a tutorial at Dharma Trading Co for painting a darling pair of kids sneakers!